
| Photo of the month – November 2011 |
[German version] |
We can safely say that this isn’t safe!
Fortunately, the vehicle arrived at its destination.
You don’t need psychic powers to identify that there are a number of things wrong with this load. If the German Federal Police had not discovered this vehicle, it would have remained forever unseen by the readers of this column.
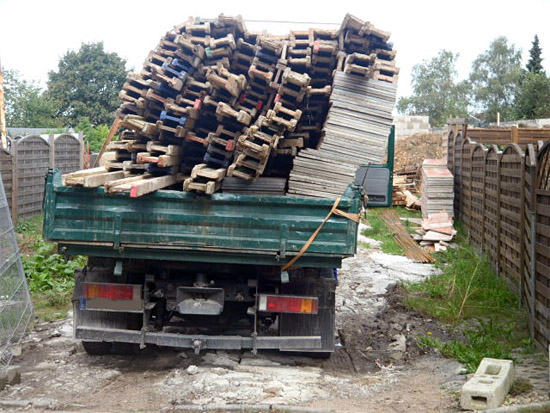
Figure 1 [Ralf Walter]
This vehicle was loaded with shuttering materials. Given a tare weight of approximately 4100 kg, the maximum payload would have been a little under 3400 kg. It is not possible to determine whether or not this payload was exceeded after the event.
As far as can be seen, the load was made up of shuttering panes and shuttering rails.
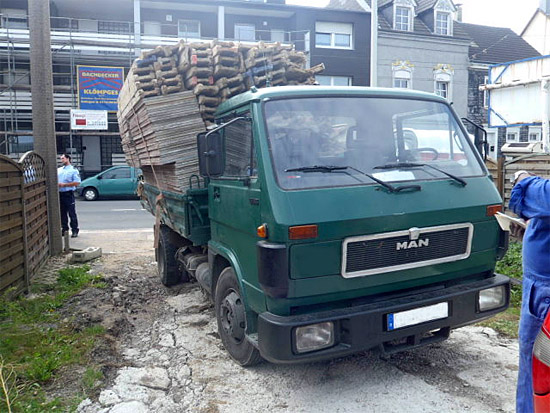
Figure 2 [Ralf Walter]
It would appear that the shuttering panes and the shuttering rails were not tied together to form load units, but were simply loaded directly onto the vehicle. Two lashing belts were all that was used to tie down the load – a pitiful attempt at securing.
It would have been difficult enough to stack the panes on top of each other without them slipping even before the journey began. And the same applies to the wooden I beams.
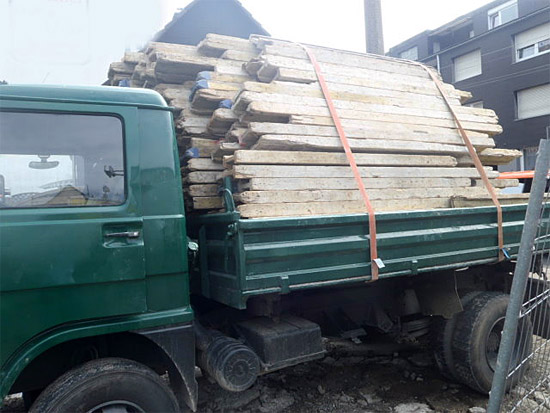
Figure 3 [Ralf Walter]
Figure 3 clearly shows that the stack has tipped or slipped to the right.
The heterogeneous nature of the load precludes us from judging whether or not the direction in which the load tipped has anything to do with the fact that the securing equipment was tensioned on one side only.
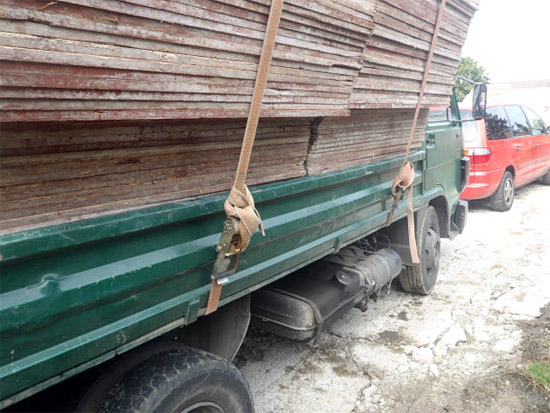
Figure 4 [Ralf Walter]
Figures 3, 4 and 5 clearly show the resulting overhang on the right. Even the side wall is bent outwards a little.
The fact that this vehicle reached its destination without losing any of its load is more than a miracle. The driver can count himself lucky that he only had to pay a fine rather than face criminal charges (culpable bodily harm or even culpable homicide).
Why do people behave like this? – Time pressure? Ignorance? Thoughtlessness?
Or is it simply immeasurable stupidity that causes people to take a vehicle loaded in this manner onto the public roads. Undoubtedly, all these factors apply to a certain extent.
What would happen if the driver suddenly had to brake or take avoiding action simply does not bear thinking about. The laws of physics would ensure that the load would be lost.
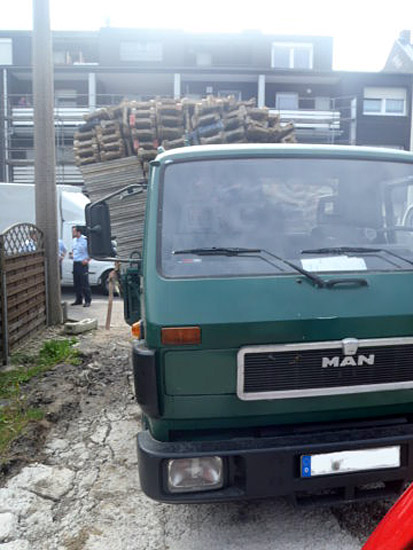
Figure 4 [Ralf Walter]
So how is it possible to transport a load like this without running the risk of losing the load or the load slipping?
It is quite simple, provided that you take a little time to plan how to secure the load, and hence how to load it.
Load units should be formed at a time when the load was stacked at the construction site or at the depot. This can be done with steel bands or with one-piece lashing belts. The shuttering panes and the wooden rails are bound together so tightly that it is impossible for individual panes or rails to slip out from these blocks.
The resulting packages are then loaded onto the vehicle in such a way that the maximum payload is not exceeded and the load distribution plan is observed.
Anchors are placed between the load units to stabilize the load.
Explanation: Unsurprisingly, the term "anchor" is a nautical one. But in this case, we don’t mean the anchors that keep a ship in place, but rather connections between two or more parts of the load that act to stabilize the load. You can see them in the diagrams below.
In the case of the shuttering panes, the load units are formed in such a way as to make packages approximately 60 cm to 80 cm in height, which are then placed behind one another in the middle of the loading area. The bottommost layer can be made up of squared lumber to allow the load to be loaded and unloaded using a forklift truck.
Squared lumber, for instance, can then be placed laterally across the two packages (these are the "anchors"), thus connecting the two packages. Further packages are then placed on top of these.
Similar packages are formed from the shuttering rails. These will be approximately the same height as the other packages and can be placed on each side of the shuttering panes. (Wooden) anchors are also placed on these packages. These wooden anchors could also be the shuttering rails laid laterally across the entire load, including the shuttering panes.
Now, it is not difficult to secure the load to the bed of the truck. Loops made from lashing belts are placed on the load to prevent slippage to all sides. If anti-slip materials are also used, the safety of the load, and hence the safety of other road users is ensured.
In this case, we cannot assess the loading area and the lashing points that are available, but we assume that, given the securing method we propose, four lashing points in good condition with a load capacity of at least 800 daN are available on each side.
The following diagrams show how the load is placed on the vehicle and how the lashing equipment can be attached. They show the top view of the loading area:
| Squared lumber is placed here to bear the load. |
The shuttering panes (two packages, one behind the other) are placed in the middle. The shuttering rails are then placed on each side. |
Squared lumber is placed across the packages as anchors. |
||
 Figure 6a |
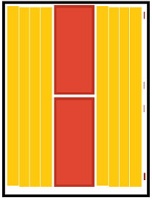 Figure 6b |
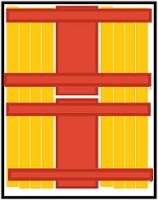 Figure 6c |
| Four belts are now placed over this layer. Two are hooked into the lashing points with the hooks to the left and two with the hooks to the right. |
Further parts of the load are then placed on this as described in Figure 6c or in a similar manner. It is important that the load is approximately the same height all over. Where necessary, the shuttering rails can be distributed to compensate for any discrepancies. You must also make sure that the belts can move freely and that the load is not placed on the belts. |
|
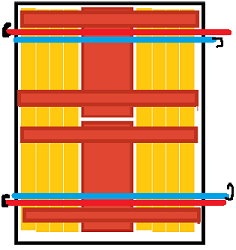 Figure 7a |
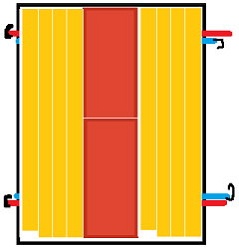 Figure 7b |
Now the loose ends of each of the lashing belts are placed over the load. The blue belts are passed from left to right where they are secured to the lashing points with the ratchets. The red belts are secured on the opposite side. It is not necessary to apply a high level of pre-tensioning force. It is sufficient to tension them lightly (sufficiently to prevent them from escaping from the lashing points).
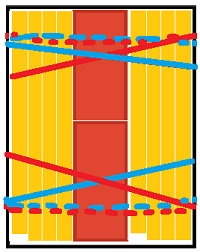
Figure 8 [Ralf Walter]
This completes securing to the sides.
It is now necessary to secure the load in the direction of travel and against the direction of travel. Because we have formed stable load units, we can use head loop lashings. See the left side of Figure 9 and the right side of Figure 10:
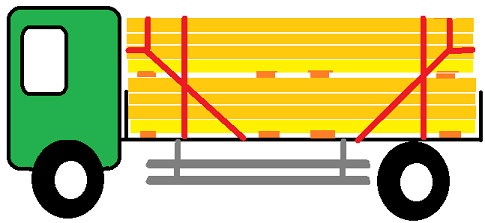
Figure 9 [Ralf Walter]
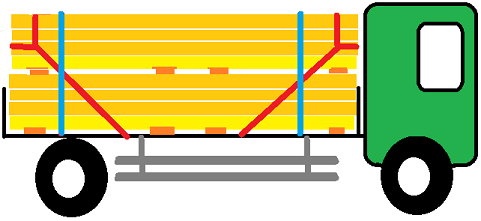
Figure 10 [Ralf Walter]
A different option would be to use load securing nets placed over the load and which can then secure the load ideally as direct lashings. Although these are initially expensive to purchase, they save a great deal of time and effort when securing loads in the long term.
We hope that the inspection by the police will be a lesson to the driver and any colleague who may have been with him. Perhaps they were made aware of the dangers forcefully enough to avoid any repetition.
Back to beginning